
A slow-cooked onion is a thing of beauty. Like roast bulbs of garlic, it undergoes a miraculous transformation into an intense sweetness yet still with a savoury edge. Texture-wise, it will be silky soft and almost falling apart.
But I’m a lazy cook. So I’m not talking here about the kind of dish that requires endless stirring of sliced onions in a saucepan until your arm drops off, and where you have to avoid everything “catching” and burning on the bottom of the pan and all you’re left with is a lovely brown mushy sludge that is perfect for, say, a bistro-classic French onion soup.
No, I’m talking about the following oven-bake method. It requires far less work, and you end up with onions that are both addictive and versatile. Whenever I have the oven on for a bake or roast and there’s a shelf spare, it’s a chance to add a baking tray of onions to roast away. And maybe a red pepper or two while I’m at it.
Afterwards, when the onions (and, indeed, the roasted red peppers) are cooked and skinned and cooled down, they will be perfect with, say, hummus or goat’s cheese.
Baked onion in 10 quick steps…
Like I said, it’s a quick and simple recipe: quarter some onions, bake in a moderate oven for an hour, peel the outer skin, store in oil. The devil is in the proverbial detail…
- Use yellow onions: take two or three “yellow” (aka “Spanish” or “brown”) onions. You know the sort. You could try the same technique with red or white onions, shallots or small “pickling” onions, scallions, spring onions or even leeks, but I always find myself returning to the common yellow onion. Medium or large, they should all be roughly the same size (otherwise they’ll have different cooking times). If you grow your own, you may have come across varieties such as Setton, Centurion or Hercules.
- Remove the outer layer, the papery dry bits. These can go into either your stock pot or the compost. If you are now down to an outside layer of “onion proper” and it still looks a tad rough, leave it on. So what if it gets tougher again during cooking? It will be coming off anyway, and it will give some protection to the rest of the onion as it bakes. And don’t bother making a “jacket” out of cooking foil – it’s wasteful. If you are doing very small onions such as scallions or thin leeks you can skip the next two steps.
- Remove the roots themselves but try to keep the root end intact.
- Quarter the onions. Some recipes call for the whole onion to go into the oven, unsliced; others tell you to slice them thinly (a fatal mistake – they will burn much faster and stick to the bottom of the dish). I prefer to halve or quarter the onions. This reduces overall cooking time while suitably increasing the amount of exposed surface area to caramelise.
- Lightly oil a baking dish, one big enough to avoid overcrowding. Keep the onion segments as intact as possible as you put them in the baking dish. Sprinkle on another small splash of (ordinary) olive oil or rapeseed oil. You could use butter instead (it tends to burn) or a mix of oil and butter, but let’s be Mediterranean Dietty here.
- Roasting times depend on many factors: the size of your onion pieces, the temperature of your oven etc, so I can’t be more exact. The oven – or, more specifically, the place where the baking dish of onions will sit in it – shouldn’t be too hot. For medium-sized yellow onions in quarters, I’d allow a good 45 minutes to an hour on the middle or bottom shelf at a maximum of 180°C (360°F).
- Check them after about half an hour of cooking. They can quickly burn to the proverbial cinder. But even when they are caramelised and just about to burn they can still taste scrummy. Try to find this tipping point.
- Take them out of the oven for good once they have reached the desired stage of caramelisation and loveliness and softness (give one chunk a gentle squeeze to measure this).
- Peel them again: take an onion chunk and peel off the outside layer of skin. It will look dry and tough, and possibly blackened. If it isn’t too burnt, don’t throw this outer layer away – use it in making stock. If the next layer down isn’t soft enough either, remove it too. Repeat for each chunk.
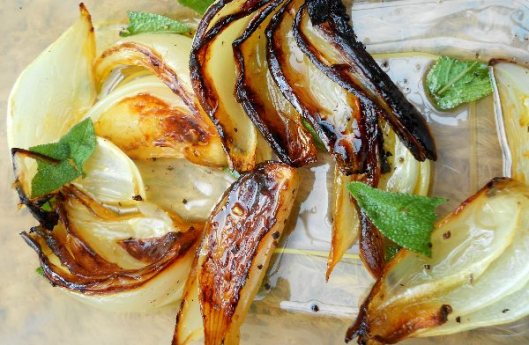
- Oil and flavour them: put the caramelised onion chunks into a plastic or glass container with the oil that they were cooked in. Fan out or completely separate the layers if you prefer. While the onions are still warm, add a good splash of extra virgin olive oil. Optional: you can first use the oil to “deglaze” the baking dish, and add a few whole peppercorns or some freshly milled pepper, a few torn or diced sage leaves, and a small splash of balsamic vinegar. Let the onions cool down and infuse these extra flavours before putting in the fridge in the fridge.
And because the onions are now already cooked and caramelised, they can speed up your other cooking during the rest of the week.
They will be happy to sit in a little olive oil in a jar or plastic tub in your fridge for three or four days, but will be poised to jump – at a moment’s notice – into many a recipe that tells you to “start by sweating an onion”.
Or treat them as a star ingredient in its own right. For example, try baking them in the oven a second time, but this time smothered* in a Gruyère-type cheese sauce with a topping of breadcrumbs and bacon lardons. Serve on toasted ciabatta or baguette. Enjoy.
(* Did I just say smothered? At last: a crime-fiction connnection.)

Bread and onions and cheese. It’s basically pizza without the fake tomato sugar sauce. Why did I never think of this before? This is a red-letter day, and I am hungry. My life will forever be divided into pre-revelatory and post-revelatory onions.